Whether it’s the old shed in your backyard or an office building, professional services can handle any size and type of shed removal. They can unhinge the doors and windows, remove any shelving or other non-structural parts, and even grind up the foundation and haul it away.
If the shed is wired for electricity or plumbing, a licensed electrician or plumber should disconnect those utilities. Once the connections are removed, knocking down the walls is easy.
Shed demolition is a big project that should be done with great care. It can also be dangerous work, especially if you’re working by yourself. Unless you have a lot of experience with demolition, it’s best to leave this task to professionals. However, there are some things you can do to prepare for this project to make the process easier and safer for yourself. First, you should empty the shed of all valuables and hazardous materials. This includes propane tanks and leftover paint. These should be disposed of according to your local regulations.
Once the shed is emptied, you can begin dismantling it. Start by removing the doors and windows. You can then take down the walls, starting from the top and moving down to avoid structural instability. If the shed has connections to the floor, remove those using an adjustable wrench and pliers. If the shed has a concrete slab, it will likely need to be broken up and removed, unless you plan to reuse the concrete in another shed or elsewhere on your property.
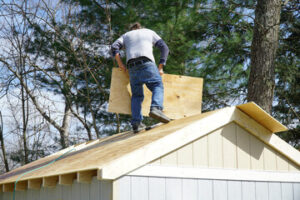
Lastly, you’ll need to dismantle the roof of the shed. If the shed has shingles, you can usually pull them up by hand or with a pry bar. If the shed has a plywood or OSB roof, you can use a circular saw to cut the boards into smaller pieces that can be easily moved out of the way.
Once the shed is dismantled, you’ll need to remove the flooring and any other non-structural elements of the shed. This includes things like shelving, storage bins, light fixtures and more. It’s a good idea to take this time to sort through any items you may want to donate or sell, as opposed to just throwing them away. You can also research your area to see if there are any charities that accept shed parts and components for recycling or reuse. This option can be a great alternative to simply throwing your old shed away.
Walls
Once you’ve removed the roof, it’s time to dismantle the walls of your shed. Start by removing any doors or windows that you can’t salvage. Once you’ve done this, it’s a good idea to empty out the shed of any things you want to keep (think tools and furniture) or sell on local marketplaces. Be sure to sort and set aside any hazardous waste materials that you’ll need to dispose of properly – this can include anything from asbestos, aerosols, chemical liquids, batteries and more.
Next, use a crowbar or sledge hammer to get rid of any nails holding the shed together. Once you’ve removed the nails, it’s a good idea to create a temporary timber support to hold up any remaining walls as you take them down. It’s a good idea to have a friend or two help you with this process, as it can be very dangerous if you’re working alone.
When you’re ready to take down the remaining walls, use a sledge hammer or pry tool to knock out or saw them away. Be very careful not to hit the support beams, as this could cause the shed to collapse in on you. It’s also a good idea to have a couple of 2x4s handy for this purpose. If you’re not comfortable with the demolition process, you can always call in a professional junk removal company to do it for you.
A professional will have the right equipment to do the job quickly and safely, which will save you a lot of time and effort. Just be sure to hire a service that’s licensed, insured and experienced with shed demolition. Be sure to ask about any extra fees, such as an additional fee for removing any electricity or plumbing connections. If your shed has electrical or water connections, it’s best to contact a professional rather than trying to disconnect them yourself, as this can be very dangerous. Once your shed has been dismantled and hauled away, you can enjoy your refreshed backyard and clear space for new projects! Be sure to check out our guide on how to clean up your yard after a shed has been removed for more tips.
Floor
Once the roof and walls have been taken down, it’s time to get to work on the floor. This is the most labour intensive part of the shed removal process. It’s recommended to empty the shed of anything you want to keep or donate before starting demolition. It will also make the job much easier and safer. Be sure to dispose of any hazardous items properly (check with local environmental services about drop-off dates). Once the shed is empty, you can start working on the demolition process. It’s best to start at the front of the shed and work your way around. This will help destabilise the structure so it falls naturally rather than being pushed down.
You will need to use a medium sized wrecking bar, a hammer, an impact driver and screw bits along with a reciprocating saw with both metal and wood cutting blades. It’s a good idea to wear safety equipment throughout this process to protect yourself from falling debris.
Start by dismantling the connections between the floor and the wall frames. These can usually be removed with pliers, however, if they are nailed down, the use of a sledgehammer will be needed. Then it’s time to pull up the floorboards. This can be a bit messy, so it’s a good idea to use a tarp to catch the falling planks and any other rubbish. Once the floorboards have been removed, you will be left with a concrete slab or the underlying floor frame depending on what was used in your shed.
If there is a concrete slab, it will need to be broken up and removed unless you have plans for it to be reused. You will also need to rake your yard to pick up any remaining debris. Finally, it’s a good idea to have a designated area where the shed is going to be removed from as this will save you from having to carry it down the street or over your neighbour’s garden bed! If this seems like too much hard work, junk removal companies can take care of everything for you.
Doors & Windows
Before you start tearing into your shed, take a moment to plan the demolition. You’ll need to determine if there are any non-structural parts that you want to save (like doors, windows, and light fixtures), make sure that the structure is free of pests and mold, and determine whether it contains hazardous materials like asbestos or lead paint. You’ll also need to decide how you will handle electrical, plumbing, and water connections. And you’ll need to have a place for all of the debris that you’re going to generate. Depending on the condition of the shed, you may need to rent a dumpster for trash disposal.
Once you’ve prepared, it’s time to get to work. Begin by unhinging the doors and windows, then removing any other non-structural items from the shed. You should also clear out the shed of its contents, as you’ll be able to donate or sell many of the items and make some extra money.
Next, it’s time to start dismantling the walls. You can do this by starting with the least structurally sound walls and working your way up to the more stable ones. Use a sledge hammer, pry tools, or a sawzall to knock down or cut through the walls and siding, but be careful not to hit any of the support beams. You’ll need to do this progressively, as you don’t want the whole shed to collapse in on you.
Once the walls are gone, it’s time to remove the floor. If the shed is a wooden floor, you can just rip it up or break it down with a sledge hammer or other heavy tool. If the floor is concrete, you’ll need a jackhammer and a concrete removal service. After the floors are gone, you’ll have to remove any ductwork, electrical wires, or plumbing that are attached to the walls and roof. This is the part where you’ll probably need a professional contractor unless you’re familiar with this type of work. It’s important to wear protective gear and follow safety guidelines at all times during shed removal.